

In today’s article, we will introduce 3 Web APIs that, when used correctly, can make the job easier for many web developers.
URL API
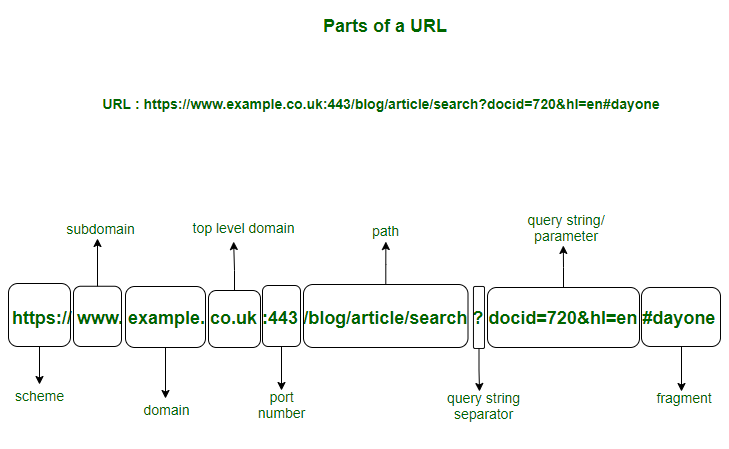
As the name suggests, the URL API is used to work with URL addresses. URL consists of several parts: protocol, hostname, port, path and query parameters.
With this API we can not only find out the individual parts, but we can also easily modify them.
At the beginning we create a new object of URL type, where we put the URL address we want to work with as input parameter.
For example:
var url = new URL("https://www.nejaka-stranka.test/blog/clanky?datum=2021-06-22&stranka=3");
If we want to get the GET value of the date parameter, we simply do it via:
console.log(url.searchParams.get("datum"));
We can list all GET parameters by iterating the value of searchParams:
for (let p of url.searchParams) {
console.log(p);
}
We will use the set method to modify the parameter. In addition to modifying an existing parameter, we can use the same method to add a new parameter.
url.searchParams.set("datum", "2020-09-28");
url.searchParams.set("novyParameter", "35");
When we subsequently want to get the whole URL back as a text string, we call the toString() method:
console.log(url.toString());
History API
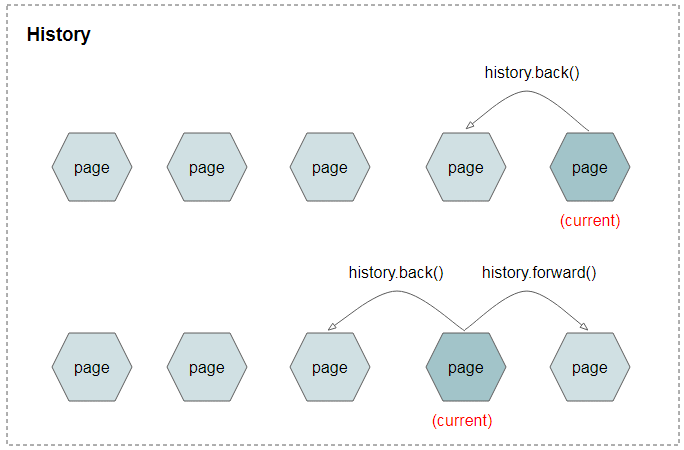
We can use the History API to manipulate the history of the browser. For example, we can replace the Back and Next buttons. We will use the back() method to go back 1 page:
history.back();
Similarly, if we want to go one page forward in the history, we use the forward() method:
history.forward();
If we want to move several pages in the history, we use the go() method. This method has the number where we want to move in the history as input parameter. For example, the number -3 means that we want to move 3 pages back. If we use 0 as the parameter, or omit the parameter, the current page will be refreshed.
history.go(-3);
HTML5 has introduced 2 new methods to History API: pushState() and replaceState(). These methods modify the history without refreshing the page. They’re very useful for single-page applications that consist of different subpages. We can move between subpages without refreshing the page. The History API is also used in frameworks such as Nuxt.js or React Router.
History in single-page applications behaves like a stack. The pushState() method inserts a new record at the top of the stack. The replaceState() method modifies the record we are currently on. When we go back a few pages in the history and then call pushState(), the entire history of the following pages is replaced by one new record.
Both methods have 3 input parameters:
- The first parameter is the data that we want to save to the subpage (record). The data can be, for example, a text string or an object. We can then obtain this data in an onpopstate event via event.state
- The second parameter is the page title. This parameter is currently ignored on all browsers except Safari. But that may change in the future.
- The third parameter is the URL address. It can be relative or absolute. However, the absolute address must contain the hostname where we are actually located. For security reasons, the browser will not allow us to change the URL address to a completely foreign page.
For example, if we want to move to a new subpage, we call:
history.pushState("nejake dáta", "titulok", "/relativna-adresa/novej/podstranky");
But when do we use the replaceState method? A typical use case is when by using the pushState method we would get into a loop in history. It must have happened to you – you wanted to return to a previous page from some page, but it wasn’t possible with the ‘back’ button, because history kept repeating itself.
For example, when we want to move to the /admin subpage, which, however, requires a login, so the subpage redirects us to /login. If we do the re-routing through pushState, clicking on the ‘back’ button would take us back to the /admin subpage and it would move us back to /login and so on. However, when we do the re-routing from /admin to /login via the replaceState() method, after clicking the back button, we don’t return to /admin, but to the subpage we came from.
The methods themselves would not be very useful if we couldn’t find out that the subpage had changed. And so, in addition to these methods, a new event was added: onpopstate. This event is called whenever we move forward or backward in history.
window.onpopstate = function(event) {
console.log("podstranka: " + document.location.href);
}
Geolocation API

The Geolocation API is used to obtain the GPS coordinates you are currently on. We use this API, for example, on the drmax project to find pharmacies in a customer’s vicinity on the subpage https://www.drmax.sk/lekarne.
For security reasons, access to the geolocation API is only possible after access is granted. Therefore, before obtaining the coordinates, the browser asks us if we want to grant the site rights to access the geolocation API. Only after approval can we access the aforementioned API.
The getCurrentPosition() method is used to get the coordinates. As an input parameter, this method has a callback to a function that gets a GeolocationPosition object as an input parameter. We can list the coordinates by calling:
function showPosition(position) {
console.log(position.coords);
}
if (navigator.geolocation) {
navigator.geolocation.getCurrentPosition(showPosition);
}
However, there may be a situation in the application where obtaining coordinates once won’t be enough, but we’ll want to monitor every change of position (for example, an application for a taxi service). We can use the watchPosition() method for this purpose.
var watchID = navigator.geolocation.watchPosition((position) => {
console.log(position.coords.latitude, position.coords.longitude);
});
The watchPosition() method returns the ID for the watcher. When we no longer need to track a user’s location, we can cancel the tracking using the returned ID and the clearWatch() method:
navigator.geolocation.clearWatch(watchID);
Conclusion
That would be all for today’s article. Next time we’ll introduce you to other useful Web APIs.